No. The calibration has been performed already by the Onit Support team! So there is no need to follow the steps inside this page.
The calibration of the camera is a one time process but it is also one of the most important processes to get the highest accuracy from Dragonfly. It allows to create a calibration file that encodes the distortion parameters of the camera optics. These distortion parameters are a function of the manual assembly process of the camera optics and of any enclosure used to protect the camera. The calibration file is used by Dragonfly to “normalize” the wide-angle images collected by the camera.
1 – Preliminary steps
- Launch Dragonfly and connect your monocular camera (following the information of the left menu).
- Click on the Three lines button and then on the Calibrate camera button.
- Type the calibration File name using a meaningful name (e.g. 180_Low_Illumination_Camera)
- Download the following calibration pattern: CHESSBOARD grid
- Print the calibration pattern on a A4 or Letter paper with no margin and place it on a plain surface.
- Do not perform the calibration if the calibration pattern printed is wavy because you won’t be able to perform a good calibration and Dragonfly won’t produce accurate results!
- Width – leave it to 640
- Height – leave it to 480
- Measure the distance in millimeters (NO inches and NO centimeters!) of the HDIST line visible inside the calibration pattern.
- Enter the distance just measured inside the field H DIST.
- Select the Mode that you would like to use for the calibration process.
- free auto mode – allows to perform the calibration process by pointing a calibration pattern from the angles chosen by the users. The poses used for the calibration will be AUTOMATICALLY collected by Dragonfly every 1 second.
- free mode – allows to perform the calibration process by pointing a calibration pattern from the angles chosen by the users. The poses used for the calibration will be collected by Dragonfly after having clicked on a button of the GU
- Inside the Pattern select the calibration pattern chose: chessboard.
- Inside the Dist model field choose:
- Wide Fov – if you are working with a 170° camera.
- Fisheye 4 distortion coeff – if you are working with a 180° camera.
You just need 1 good calibration file. There is no need to perform the calibration process with ALL the calibration methods
2 – Calibration steps
2.1 – Free-auto mode
The free auto mode allows to perform the calibration process by pointing a calibration pattern from the angles chosen by the users. The poses used for the calibration will be AUTOMATICALLY collected by Dragonfly every 1 second.
- Click on Start calibration.
- Now you just have to point the camera towards the calibration pattern until you should see the black dots/squares being connected by colored lines. The first pose will be AUTOMATICALLY captured by Dragonfly (and you will see the taken image count counter growing).
- Please make sure that the camera and the pattern are close. Otherwise the calibration result won’t be usable!
- Now you have to move the camera and point the calibration pattern from a different angle every 1 second so that Dragonfly can capture all the other poses.
- You will have to collect a total of 21 poses. Please make sure to collect images close to the pattern and from different angles!
- After you have collected all the poses, the Dragonfly App will automatically start the computation of the calibration parameters of your camera.
- It should take few seconds and the calibration file will be automatically saved inside the configuration folder of the Dragonfly App.
- If you see a black screen instead of the video feed coming from your camera, then there are chances that the calibration process did not produce a good calibration file. In this case you just have to repeat the calibration process.
- Then the calibration file is automatically saved and the state will be: CALIBRATED.
- Click on the Return button to exit the calibration process.
2.2 – Free mode
The free mode allows to perform the calibration process by pointing a calibration pattern from the angles chosen by the users. The poses used for the calibration will be collected by Dragonfly after having clicked on a button of the GUI.
- Click on Start calibration.
- Now you just have to point the camera towards the calibration pattern until you should see the black dots/squares being connected by colored lines. When this happens click on the camera button to capture the pose and you will see the taken image count counter growing.
- Please make sure that the camera and the pattern are close. Otherwise the calibration result won’t be usable!
- Now you can move the camera and point the calibration pattern from another angle.
- You will have to collect a total of 21 poses. Please make sure to collect images close to the pattern and from different angles!
- After you have collected all the poses, the Dragonfly App will automatically start the computation of the calibration parameters of your camera.
- It should take few seconds and the calibration file will be automatically saved inside the configuration folder of the Dragonfly App.
- If you see a black screen instead of the video feed coming from your camera, then there are chances that the calibration process did not produce a good calibration file. In this case you just have to repeat the calibration process.
- Then the calibration file is automatically saved and the state will be: CALIBRATED.
- Click on the Return button to exit the calibration process.
Now, we recommend to check the calibration quality by following the next steps.
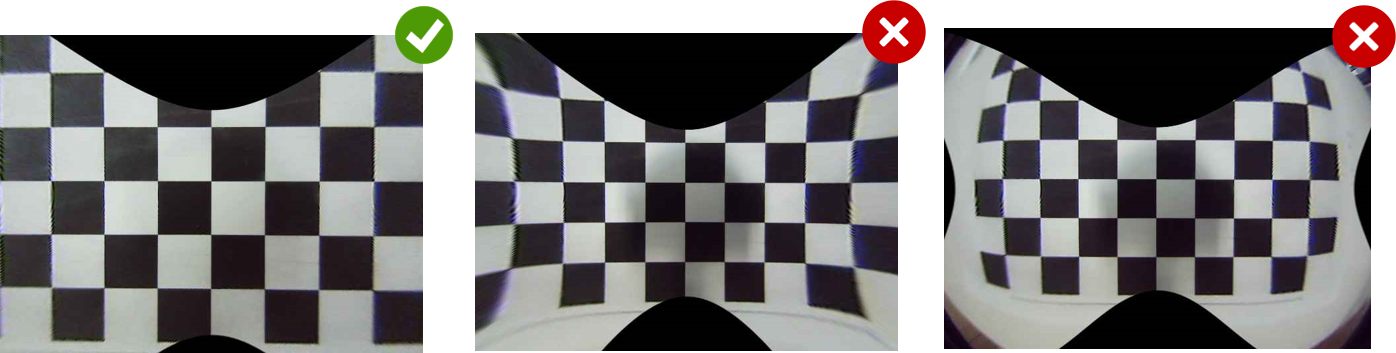
3 – Verify the calibration quality
To verify the calibration quality please:
- Click on the Three lines button and then on the Site settings button.
- Click on the Camera menu and chose the Camera sub-menu.
- Select the Calibration File just computed and click on Preview
- Now point the camera towards a square or rectangular shape and verify that the lines/shapes that are straight on the square/rectangular shape are also straight inside the video preview.
- If this is the case then the calibration computed is good.
- If this is NOT the case then it might be that something went wrong during the calibration process. Please repeat the calibration process and make sure to
- Select:
- Wide Fov – if you are working with a 170° camera.
- Fisheye 4 distortion coeff – if you are working with a 180° camera.
- Collect images close to the pattern and from different angles!
- Select:
4 – Convert the calibration file with the resolution used for your project
The calibration file just computed works when Dragonfly is used at 640 x 480 resolution. If you need to use Dragonfly at a different resolution please get in touch with Onit at support.onplant@onit.it and we will convert your calibration file so that you can use it at 720 x 960 or 1080 x 1440.