 Is your environment compatible for the use of Dragonfly?
Before starting the mapping process you need to make sure that your environment meets the requirements for the use of Dragonfly. You can find those requirements inside this page.
What is a map?
A 3D map is the virtual representation of what has been seen by Dragonfly through the camera. It is basically the digital twin of your ceiling. A 3D map file is not human readable and nor readable by any other software. A 3D map of a specific area is composed of 2 files:
- A BIN file that contains the features related to the shapes of the elements in the ceiling,
- A JSON file that contains the geo-referencing points (3D map coordinates and the X,Y coordinates), the FOV used to create the map and the list of fiducial panels seen along with their info (ID, 3D map coordinates).
The map files can be found inside the C:\Users\USER_NAME\AppData\Local\Onit\dragonfly\clients\CLIENT_ID\SITE_ID\maps folder
Mapping step by step
Step 1 – Choose the moving asset for the mapping
As a rule of thumb, we strongly suggest to perform the mapping process with the camera mounted on the same moving asset that you will track in production. So if, for example, the asset that you will track is a forklift with the camera mounted on the roof and pointed towards the ceiling, then we strongly suggest that you perform the mapping with the exact same configuration (regardless of the wiring or the fine tuning that will have to be done to equip the production forklift fleet).
Anyway there are situations in which the asset you have to track might be cumbersome or you don’t have the license to drive it. In these cases you can also perform the mapping with the camera attached firmly to an photography telescopic stand that is attached to a trolley with big and good wheels (on which you can carry around a laptop running Dragonfly). Doing so:
- the photography telescopic stand will allow to set the camera at the same altitude at which you have created your maps (+-10 cm).
- the small size trolley will allow to move freely inside the environment and perform the loop closures described in the next part of this page.

Step 2 – Set the starting FOV
The very first step you have to do before starting the mapping is to set the FOV chosen during the design of the fiducial panels for the specific environment you are about to map. For open spaces the FOV is usually 120° and for areas with racks the FOV is usually 100°. Anyway what rules your choice is the document created for the design of the fiducial panels and/or the Excel file used to compute the specifics of the fiducial panels.
To set the FOV inside the Dragonfly Web UI:
- click on the 3 bars button and select Camera Settings.
- check if the calibration file is the one of the specific camera you are using!
- set the Field of View and press Preview before save.
- look at the Video preview. If:
- There are no black arcs or only black arcs in the top and bottom sides of the frame then the FOV is good and you can press on the green SAVE button.
- There are black arcs in all the 4 sides of the frame -> then the selected FOV is NOT good and you need to decrease it. Please decrease it by 5°, click on Preview before save and check the arcs with the new FOV.


Step 3 – Initialize the mapping
Once Dragonfly is configured properly you can initialize the mapping and create a map of the environment. During this process the Dragonfly Web UI will:
- visualize the position of your camera as a drone moving inside a 3D space;
- provide the position of your camera as un-dimensioned raw coordinates + orientation;
Follow these steps to initialize the mapping:
- Clean the camera glass by wiping it first with a damp cloth and then with a dry cloth.
- Move, with the device used for the mapping process, in a location on the perimeter of the venue.
- Click on the 3 bars button and make sure that Navigation only checkbox is NOT checked (otherwise you will get an error “Map file does not exist!” when you will try to start the mapping).
- Click on the button New Map to remove any loaded map.
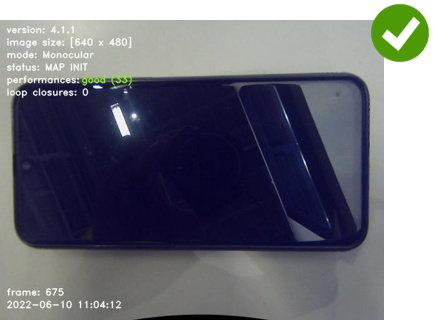
- Press on the green START button. The video feed should be displayed inside the video preview window. You can drag and drop the corner to modify the size of the video preview window.
- If nothing is shown inside the video preview then it means that the calibration file has not been selected OR the USB camera is not properly connected.
- The status of the Dragonfly engine shown in the top bar will be System Initialization.
- Move your camera with a translation movement (not a rotation movement!) towards a chosen direction to start detecting the features associated to the objects in your environment + the fiducial panels. The status should switch from System Initialization to Mapping.
Step 4 – Evaluate the fiducial panels detection
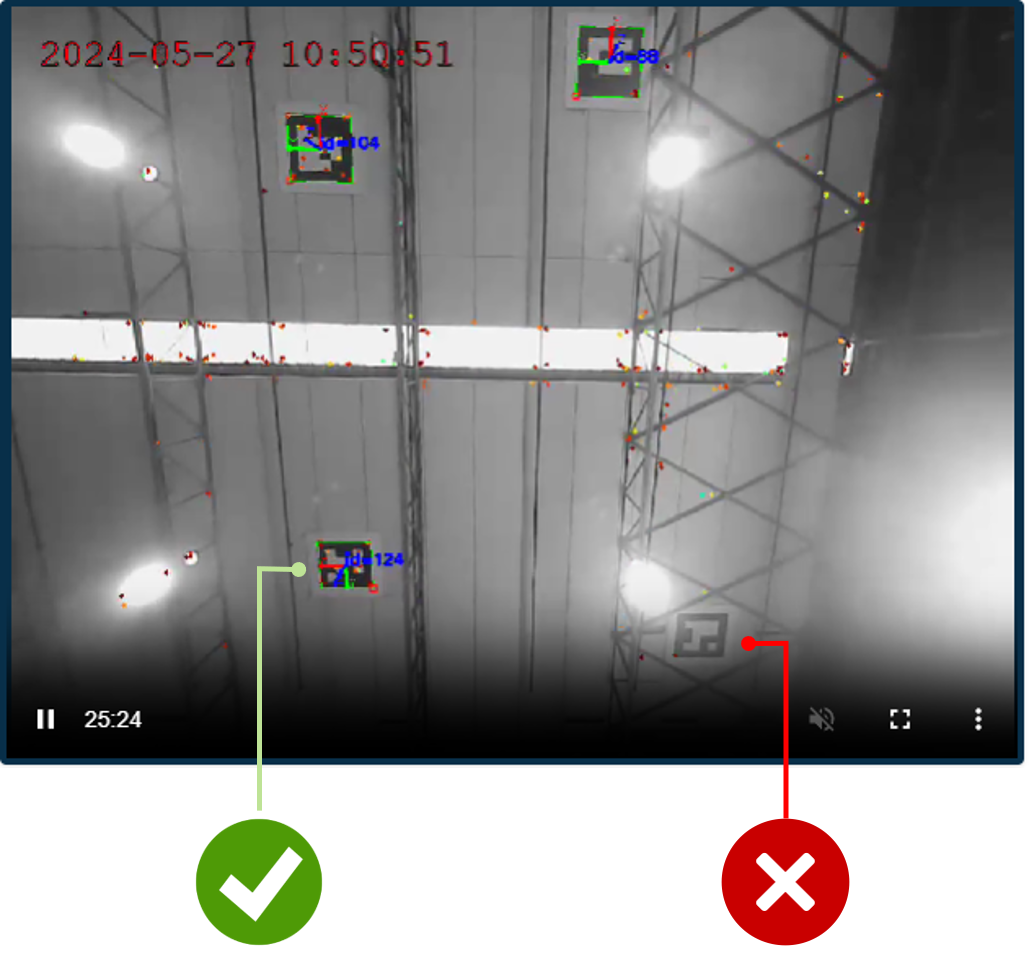
Once the mapping has been initialized you can move around freely in order to verify 2 important things about the fiducial panels installed:
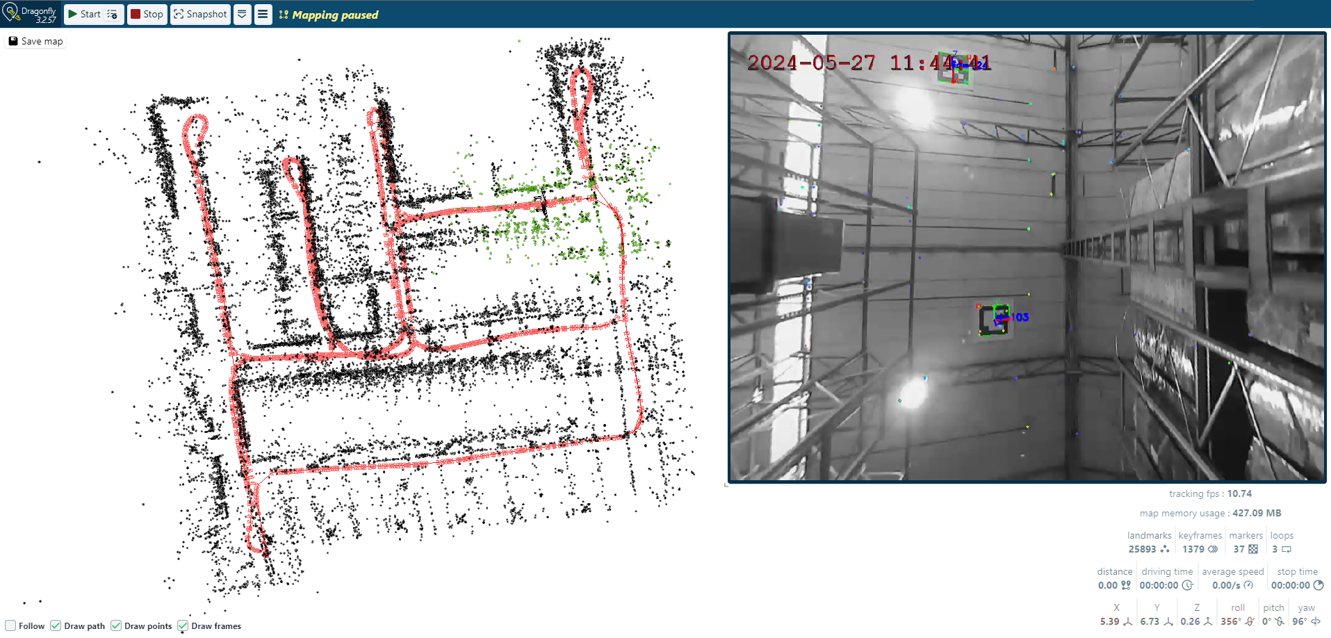
- the robustness of the detection – while moving under the fiducial panels you want them to be identified in a stable manner. Stable means that the fiducial panels should have the axis symbol and ID superimposed for as long as possible (like in the image below). If the fiducial panels are not detected in a stable manner then you can start again from Step 2 and decrease the FOV of 5° in order for the ceiling to look closer.
- the constancy of detection – meaning that while moving around you want to have always at least 1 fiducial panel insight. If there is not always 1 panel in sight then you can start again from Step 2 and increase the FOV of 5° in order to see more of the ceiling.
 Step 5 – Map the perimeter
The first thing to do during the initial mapping phase is to move with the camera along the perimeter of the area of interest and close 1 loop. To do so:
- Initialize the positioning process following the previous section.
- From a chosen starting point, move with the camera along the perimeter of the area you would like to map until you reach again the starting point. During this process, if the status switches from Mapping to Lost you have to move back to the area already mapped until the status switches back to Mapping and then you can keep following the process outlined.
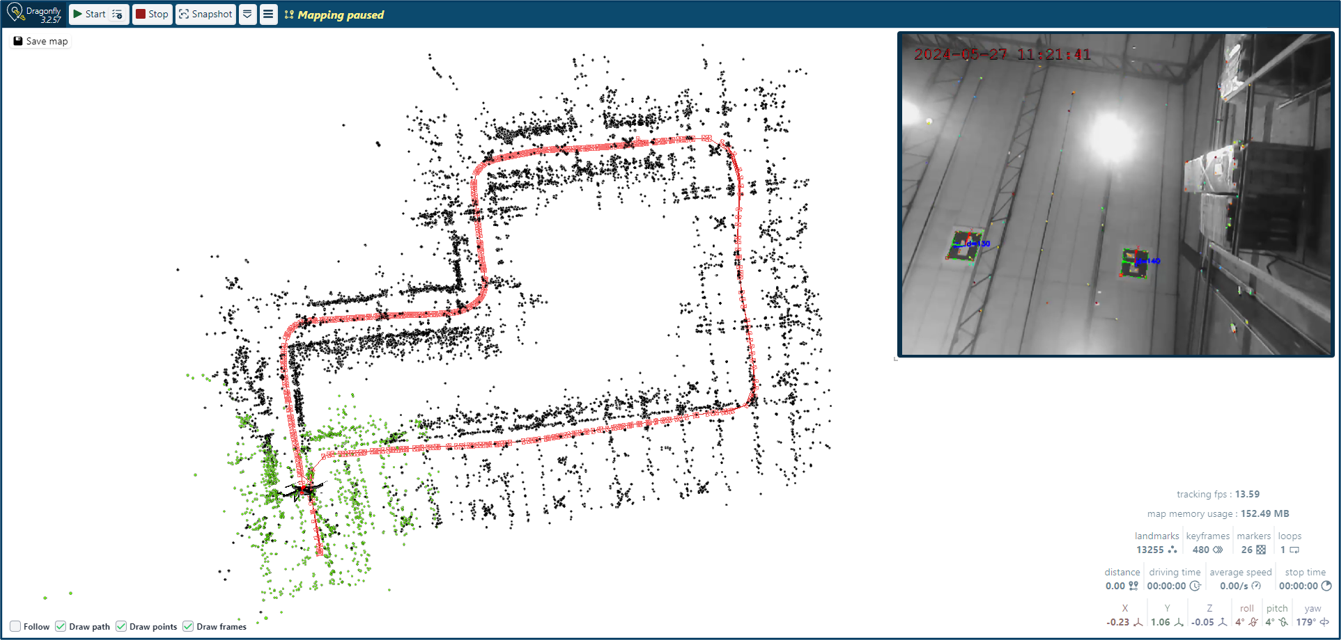
- At the end of this process you have closed your first loop and the loops field in the bottom-right corner will be increased by 1 unit. If you still don’t have a loop closure after having moved back to the starting point than keep moving a bit more along the path already taken.
- Click on the Save map button to open the pop up and save the map with a chosen name and description. You can save it with a name like: “warehouse1_loop1” or use the name pattern functionality (click here for more info).
During this process the RED thread inside the 3D space should follow the path of the camera.
Drift of the position
Depending on the size of the venue during this initial mapping (when the environment is completely unknown to Dragonfly), you might notice that the RED thread might start drifting. This is a normal behavior and the drift is auto-corrected after the the first loop closure. If the drift is not corrected and you experience inaccurate position, please send us the information listed inside this page.
Step 6 – Map the rest of the environment
After having mapped the perimeter of the area of interest you can map everything else. There might be 2 situations:
- Mapping of additional internal areas to close additional loops – from a chosen, already mapped, starting point along the perimeter, you move with the camera towards an un-mapped area until you reach another area that has already been mapped. This will allow you to close additional loops (shown in the bottom-right corner.
- Mapping of blind alleys – from a chosen, already mapped, starting point, you move with the camera towards an un-mapped area until you reach the end of that area and you move back to the initial starting point. You might see a slight drift of the map depending on the length of hallway. Don’t worry about that.
During the mapping process we encourage you to save the progresses done by creating NEW maps that contain all the progresses done. Doing so you can go back to a previously saved map in case of problems during the mapping process. To do so, click on the Save map button to open the pop up and save the map with a chosen name and description. You can save it with a name like: “warehouse1_loop2” or use the name pattern functionality (click here for more info).
Keep moving into unexplored area until the whole environment has been mapped. During this process the RED thread inside the 3D space should follow the path of the camera. Once the whole environment has been mapped you can move freely inside it and Dragonfly will display your position without getting LOST.
Variable lighting conditions
If Dragonfly will have to be used inside venues with variable lighting conditions then the mapping will have to be done in various lighting conditions. This means that a map during daylight will have to be extended with the features collected during an additional mapping session done during the night. The instructions about this can be found inside this page.
Please send us the information listed inside this page.
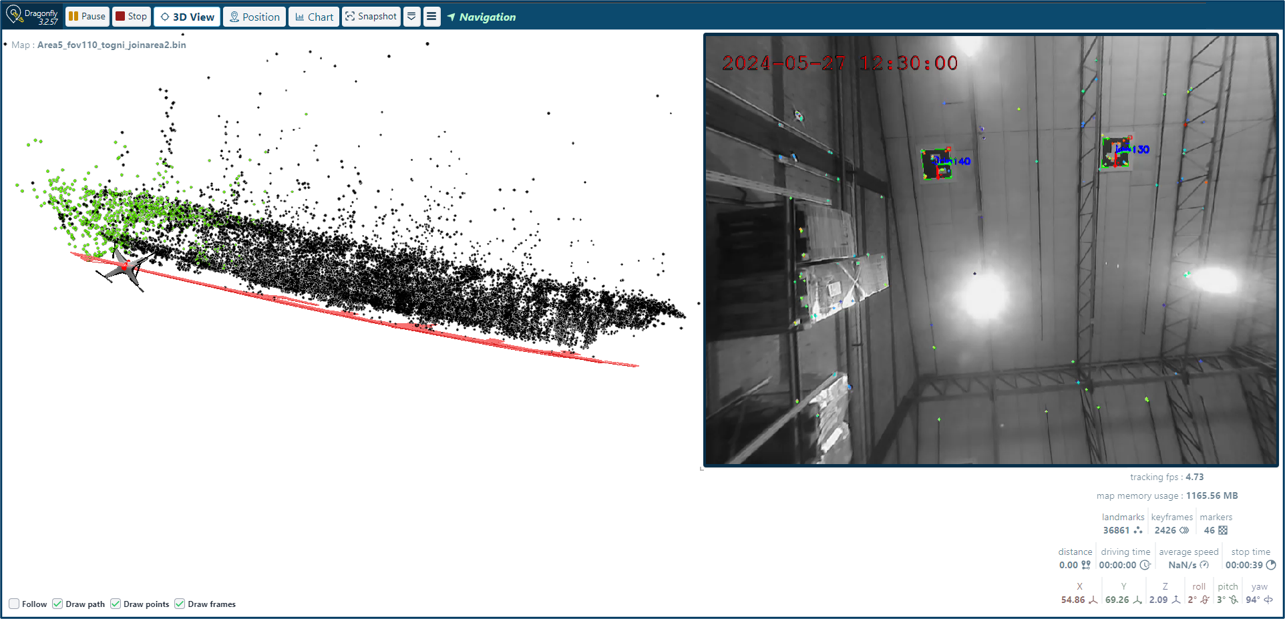
Evaluate the quality of a map
While creating the map you have to evaluate if the map is good or not. To do so you have to check these things:
- The RED thread must look plane when looked from the side (see image on the left)
- When looking at the 3D point cloud map from the top there MUST NOT be major drifts and the displacement of the cloud dots should allow to recognize the area you are working in.
 Information inside the Dragonfly UI
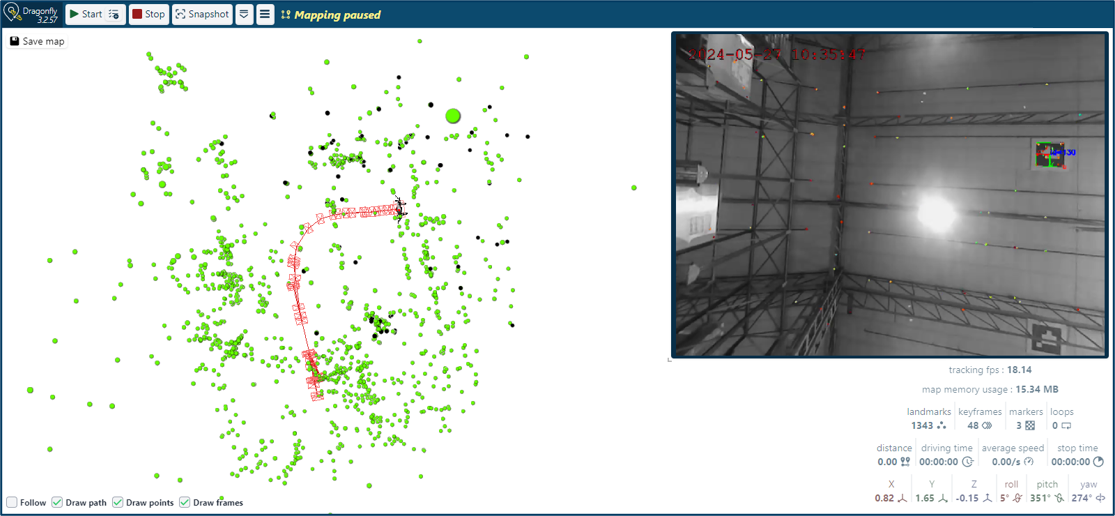
Central area
A 3D space where:
- the flying drone represents your camera. You can use your mouse to zoom.
- the RED thread represents the path followed with the camera.
- the green dots are the features currently seen by your camera.
- the black dots are the features previously seen by your camera.
Top-left corner
- name of the current map (if already saved).
- Save map button.
Top-right corner
- the video preview on the right that shows what is seen by the camera where the dots represent the features associated to objects detected in your environment. The colors of the dots are a function of the distance between the features and the camera lens.
Bottom-right corner
- tracking FPS – provides an indication about the speed at which the system runs (it must be higher than 20 FPS to produce good results).
- map memory usage – weight of the map.
- Landmarks – number of features associated to objects/shapes detected in your environment and part of the current map.
- Keyframes – number of keyframes detected so far.
- Markers – number of ArUco markers detected so far.
- Loops – number of loops closed.
- distance, driving time, average speed, stop time – usage information (provided after the geo-referencing process).
- X, Y, Z – these are the un-dimensioned raw coordinates.
- roll, pitch, yaw – orientation in degrees of the device (more info inside this page).
Bottom-left corner
- Follow checkbox – to enable/disable the automatic movement of the interface when the device moves.
- Draw Path checkbox – to enable/disable the red thread.
- Draw Points checkbox – to visualize/hide the features associated to the objects and shapes detected in your environment.
- Draw frame – to visualize the keyframes.
Top bar
- Start/stop button – to start and stop the positioning engine to perform the mapping process.
- Pause button – to pause the mapping process without stopping the engine.
- the down arrow – to visualize:
- the built-in parameters of the location engine.
- the camera parameters (that can be changed by clicking on the 3 lines button and then on the Camera Settings button)
- the 3 lines menu with these buttons:
- Navigation only – enable or disable the Navigation mode. While the system is in Navigation the map used for Navigation is not updated or changed during the navigation process. The navigation mode allows users to manage the virtual markers used for the geo-referencing of the map.
- Show video image – which allows to hide and show the video preview available on the top-right side of the GUI.
- Enable Aruco – to enable/disable the usage of ArUco markers. The ArUco markers are artificial fiducials used to make the maps more reliable when there is a low number or variability of the natural features. More info inside this page.
- Store source feed video – which allows to save the original/raw video coming from the camera.
- Store processed video – which allows to save the processed video.
- Dashboard live location – to enable the possibility to see the live location inside the cloud dashboard. storage of the location data. An Internet connection is required to send position data to the Dragonfly Cloud Server.
- Save path in device – to enable the storage of the location data locally.
- Publish (camera info, settings, calibration files, maps, floorplans) – allows to push the local data to the Dragonfly Cloud Server in order to share settings, calibration files, maps, floor plans with other Dragonfly instances (e.g. a fleet of forklifts).
- Calibrate camera – to calibrate the camera as described in this page.
- Camera settings – to access all the settings related to your camera (shown ONLY when the location engine is STOPPED).