How to select the camera
- Connect your monocular USB camera to the Dragonfly computing unit.
- If Dragonfly is not running then launch Dragonfly following the instructions available in the left menu.
- Click on the Three lines button on the right side of the top menu and click on Camera settings.
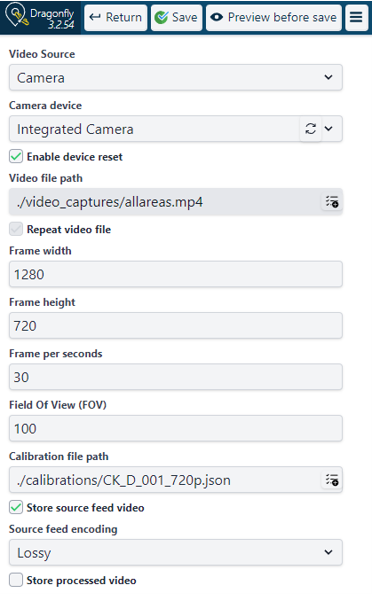
- Set the Video source to Camera.
- Refresh the list of cameras connected to your computing unit with the refresh arrows inside the Camera device drop down menu and then select the camera that you would like to use.
- Set the Frame width and Frame height compatible with the specific computation unit you are working with. Please ask to the Onit Support team!
- Leave all the other fields as-is and click on Preview before save. You should now see the video preview of your camera on the right side of the screen.
- If you are using a wide-angle camera (as you should) and the camera has not been calibrated yet then the objects inside the video preview will look distorted. Don’t worry about this for now.
- If you don’t see anything it could be that the specific camera you are working with is not compatible with the resolution chosen.
- Click on the green button to SAVE.
About the camera parameters
Here is an explanation about all the parameters within the page:
- Video source – the video source used by Dragonfly can be:
- a USB camera directly connected (CAMERA).
- a network camera (GSTRAMER).
- a video file (VIDEO FILE).
- Camera device – select the correct USB camera connected to your computing unit. To do so: refresh the list of cameras connected to your computing unit with the arrows inside the drop-down menu and then select the camera that you would like to use.
- Frame width and height – are used to control the resolution at which Dragonfly performs the calibration of the camera. Onit will tell you what resolution you should use based on the computation unit.
- Frame per seconds – leave it at 30 fps.
- Field of view (FOV) – this is an important parameter function of the camera used and of the characteristic of your environment (in the next slides we will see how to choose the correct value).
- Calibration file path – this field is used to select the calibration file for your camera. If you have multiple cameras, you MUST mark each camera with an ID using labels or duct tape (e.g., CAM_1, CAM_2, …).
- Store source feed video – allows to store the raw video file. Those videos can be used to create new 3D maps with different FOV/algorithm parameters.
- Source feed encoding – leave it as “Lossy”.
- Store processed video – allows to store the video file normalized and processed by Dragonfly. You can leave this option un-checked.
|
 |
