These are the 2 steps to set the correct Camera Field Of View (FOV) for your camera:
Step 1 – Verify the FOV range recommended for your camera
The first step is to look at the following table and verify which are the recommended FOV values for the most common cameras:
| Monocular | Stereoscopic | ||||||
|---|---|---|---|---|---|---|---|
| Camera | Dragonfly Kit USB camera + 180° lens | Dragonfly Kit USB camera + 170° lens | SainSmart Wide Angle FOV160° 5-Megapixel Camera Module - for Raspberry Pi | USB Camera (no fisheye) | Generic smartphone/tablet | ASTAR CaliCam® Fisheye Stereo Camera | ASTAR CaliCam® Fisheye Stereo Camera |
| Recommended FOV | between 110° and 130° | between 60° and 80° | 100° | 0° | 0° | 120° | 90° |
Step 2 – Verify if the FOV set is correct
The second step is to find the best FOV for your camera. The best FOV is the FOV that:
- allows to see as much of the fixed elements of the environment as possible.
To find the best FOV you need to test the values within the range shown in the table above starting from the lowest value. To do so:
- Click on the Configuration tab.
- Set the first Field Of View value that you want to test.
- Press Save Configuration and Restart.
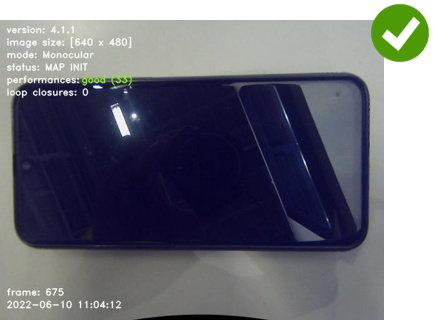
- Press on the GREEN PLAY button to activate the camera. If:
- There are no black arcs in any of the 4 sides of the frame -> then it means that the selected FOV can be increased a bit. Please increase it of 10° and test the new FOV.
- There are black arcs slightly seen in the upper and lower side of the frame -> then the selected FOV is good.
- There are black arcs that covers a LOT of the frame -> then the selected FOV is NOT good and you need to decrease it. Please decrease it of 10° and test the new FOV.


Aren’t sure about the FOV value set?
Please send us the image of the video preview and your calibration file and we will let you know right away if the FOV value is correct.
Please send us the image of the video preview and your calibration file and we will let you know right away if the FOV value is correct.
Important note about the “real” FOV of some cameras
There are some cameras for which the output image is cropped when the resolution is set to a value lower than the maximum resolution and thus the FOV is different than the maximum FOV shown in the specifications. In this situations the FOV shown in the table above is not good and needs to be reduced.
Example
The FOV of the ELP-USBFHD01M-L170 camera (when the Camera image width is set to 640 and the Camera image height is set to 480) is NOT 170° (as when the camera is used at 1920 X 1080). So, setting a FOV of 120° makes the image too cropped (and black arcs would cover a big part of the image). This is why the right FOV in a situation like this one is 70°.